Are you leveraging the power of Google Firebase for your app or website development, but find yourself concerned about unexpected costs with the Blaze plan’s autopay feature? While Firebase offers incredible scalability and a generous free tier, understanding and managing your billing is crucial. This comprehensive guide will walk you through exactly how to disable Google Firebase Blaze autopay, ensuring you maintain control over your spending without sacrificing the benefits of this robust platform.
Understanding Firebase Blaze and Autopay
Before we dive into the “how-to,” let’s quickly clarify what Firebase Blaze is and why autopay is a standard feature.
Google Firebase operates on a “pay-as-you-go” model, especially with its Blaze plan. The Blaze plan is designed for projects that scale, offering unlimited resources beyond the free Spark plan’s quotas. This flexibility comes with a billing mechanism where you’re charged for your actual usage (e.g., database reads, storage, function invocations). Autopay is enabled by default to ensure uninterrupted service as your usage grows.
While convenient for high-traffic applications, autopay can be a source of anxiety for developers or small businesses with fluctuating usage or strict budgets. The good news is, you can manage it!
Why You Might Want to Disable Autopay
There are several valid reasons why you might consider disabling autopay for your Firebase Blaze project:
- Budget Control: You want to manually approve payments to avoid any surprises.
- Project Inactivity: You’ve paused development or a project is temporarily inactive, and you want to prevent charges for incidental usage.
- Testing & Development: You’re in a testing phase and want to closely monitor costs before a full launch.
- Switching Plans: You’re planning to downgrade to the Spark plan or migrate services.
Step-by-Step Guide: Disabling Firebase Blaze Autopay
Unfortunately, there isn’t a direct “Disable Autopay” button within the Firebase console itself, as billing is managed at the Google Cloud Project level. This means you’ll need to interact with your Google Cloud Billing account linked to your Firebase project.
Here’s the workaround to effectively manage and prevent automatic charges:
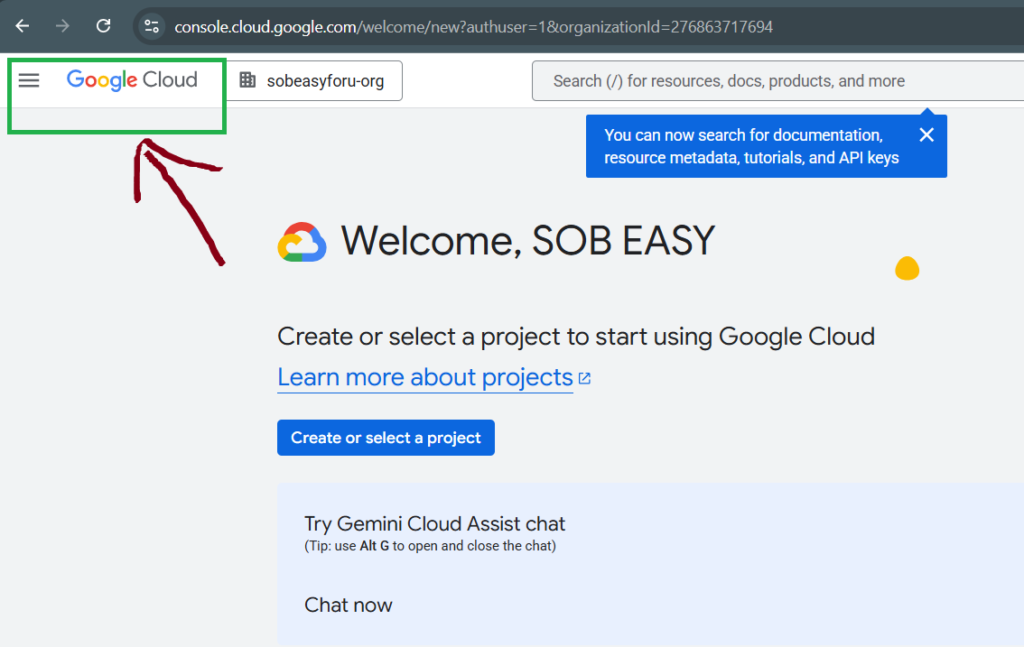
Step 1: Access Your Google Cloud Console
Your Firebase project is essentially a Google Cloud Project. To manage billing, you need to go there.
- Go to the Google Cloud Console: Open your web browser and navigate to console.cloud.google.com.
- Select Your Project: In the top navigation bar, ensure you have selected the correct Google Cloud Project that corresponds to your Firebase project. If you have multiple projects, use the dropdown menu next to “Google Cloud” to choose the right one.
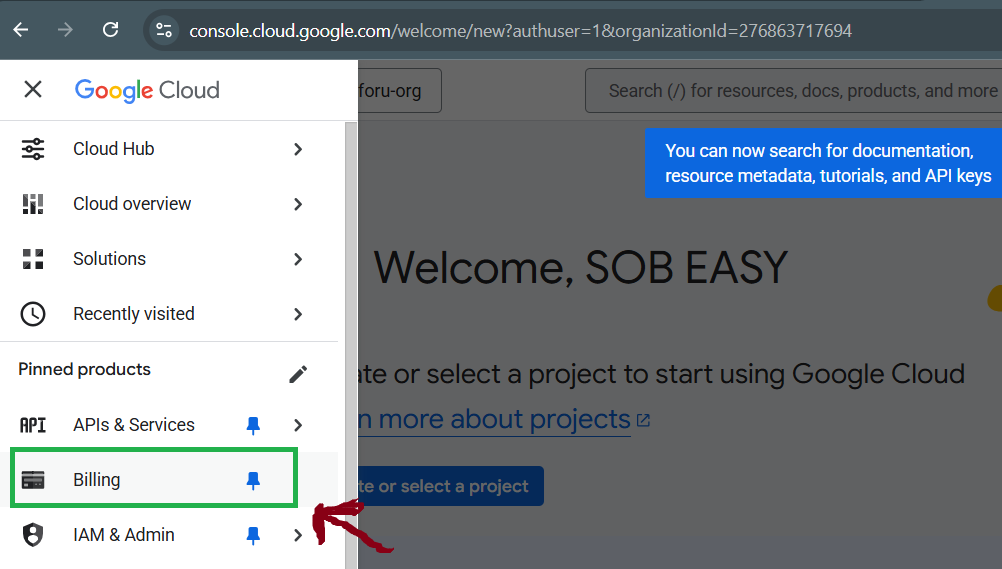
Step 2: Navigate to Billing
Once your project is selected, you need to find the Billing section.
- Open the Navigation Menu: Click the “Navigation menu” (three horizontal lines) in the top-left corner.
- Select “Billing”: Scroll down and select “Billing” from the menu.
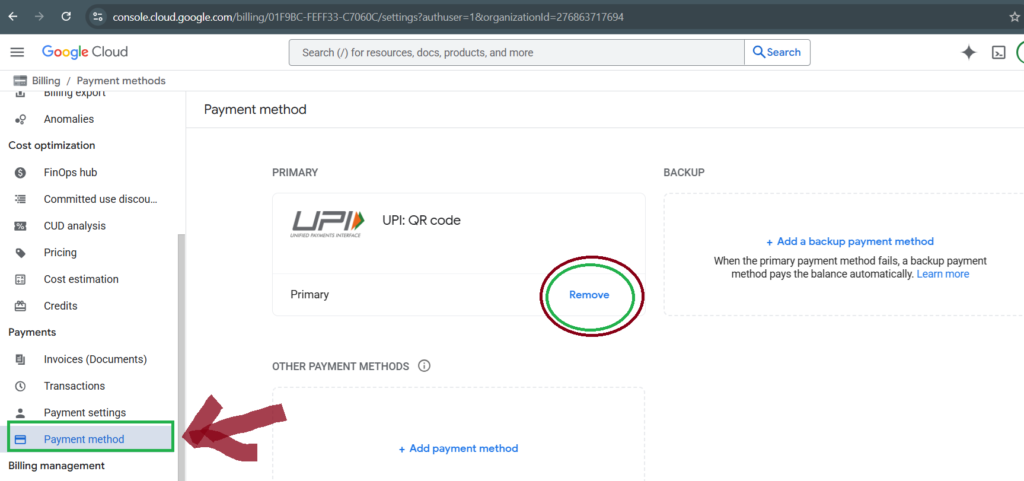
Step 3: Manage Payment Settings
In the Billing section, you’ll find options related to your payment account.
- Go to Payment Method: On the left-hand navigation, click on “Payment method.”
- Remove or Update Payment Instrument: Here’s where you manage the actual payment methods.
- Option A (Recommended for Disabling Autopay): Remove your payment method. This is the most direct way to prevent automatic charges. If there’s no payment method on file, Google Cloud cannot process an autopayment.
- Click “Manage payment methods.”
- Find the payment method linked to your billing account.
- Look for an option to “Remove” or “Delete” the payment instrument. Confirm your decision.
- Option B (Alternative): Replace with a prepaid card or a card with a low limit. If you still want a payment method on file but want to control spending, you could replace your primary card with a prepaid card that you only load when you intend to make a payment, or a credit card with a very low limit.
- Option A (Recommended for Disabling Autopay): Remove your payment method. This is the most direct way to prevent automatic charges. If there’s no payment method on file, Google Cloud cannot process an autopayment.
Step 4: Monitor Your Usage and Bills
Even after removing your payment method, it’s crucial to keep an eye on your usage.
- Set Up Budget Alerts: While in the Google Cloud Billing section, navigate to “Budgets & alerts” (under the “Billing” menu).
- Click “Create Budget.”
- Define a budget for your project (e.g., $1, $5, or whatever your desired maximum spend is).
- Set alert thresholds (e.g., notify me at 50%, 90%, and 100% of my budget).
- This will send you email notifications if your usage approaches your set limit, giving you time to react before exceeding your desired spend.
- Regularly Check Billing Reports: Periodically review your “Reports” section under Billing in the Google Cloud Console to see your usage breakdown and current charges.
Important Considerations and Warnings
- Service Interruption Risk: Removing your payment method means that if your usage exceeds the free Spark plan limits, your Firebase services will eventually be suspended or stopped until a valid payment method is added and outstanding charges are settled. This is a critical point!
- Downgrading to Spark Plan: If you want to entirely avoid being billed, consider if your project can operate within the generous limits of the Firebase Spark (free) plan. If so, you can technically downgrade your project. However, simply removing your payment method and staying within the free tier is often a more direct approach to “disabling autopay” while still being on the Blaze plan (but only paying if you exceed free limits, and then only if a payment method is present).
- Outstanding Balances: If you have any outstanding balance when you remove your payment method, Google Cloud will still try to collect it.
- Re-enabling Services: To re-enable full Blaze services after removing your payment method, you will need to add a valid payment method and potentially pay any accumulated charges.
Alternative: Downgrading Your Project to the Spark Plan
If your project’s needs fall within the free tier, the most straightforward way to avoid any potential charges (and thus effectively “disable autopay” by removing the need for it) is to downgrade your Firebase project to the Spark plan.
- Go to Firebase Console: Navigate to console.firebase.google.com.
- Select Your Project: Choose the project you wish to downgrade.
- Access Project Settings: Click the gear icon next to “Project Overview” and select “Project settings.”
- Navigate to “Usage and billing”: In the settings menu, find and click on “Usage and billing.”
- Modify Plan: Look for the option to “Modify plan” or “Downgrade.” If you’re currently on Blaze, you should see an option to switch to Spark.
Note: Downgrading will immediately apply the Spark plan limits. If your project is currently exceeding these limits, some services might be interrupted or stop functioning until usage drops within the free tier.
Conclusion: Take Control of Your Firebase Spending
Managing your Firebase billing doesn’t have to be a mystery. By understanding that Firebase billing is tied to Google Cloud Billing, you gain the power to control how and when you’re charged. Whether you choose to remove your payment method for strict autopay prevention or downgrade to the Spark plan, these steps empower you to use Firebase confidently while staying within your budget.


